Create a training
Modified on: Wed, 11 Aug, 2021 at 1:41 PM
To create a training, follow these steps:
Go to the section "Trainings" in the left side menu to access the training history
Click on the "Create a training session" button to access and complete the different sections:
General data
Title: look for a name that briefly explains the training. Maximum 80 characters
Description: specify in more detail what the training consists of and what knowledge areas are included:
Text: Maximum 500 characters
Link: Remember that in the "Description" section you can add an external link to a website or a document found in your organization's cloud:
Select the text to which you want to add the link
Click on the "Link" button in the menu
In the pop-up window, paste the link in the "To what URL should this link go?" part
Click on the "Insert Link" button to save the changes
Number of questions per day: How many questions per day do you want users to answer
Cover page: we recommend that you add a multimedia file. Remember the features of the media files you can import
Images with jpg, jpeg, png or gif format and dimensions 700x300px. We recommend the following image editing tool: https://www.iloveimg.com/es
Audios in mp3 or wav format with a maximum size of 10MB
Videos in mp4, webm or ogg format with a maximum size of 10MB
Advanced settings, here you can activate the following options:
Default training: Activate this functionality if people in your organization are going to access Zapiens for the first time through a registration code. This way, they will automatically be able to participate in the default training. Check out our article Generate a registration code
Memorize: Activate this feature if you want people in your organization to review or remember failed questions and questions added through the "Memorize" button in the App. Check out our article What is Memorize?
Click on the "Save" button
Note: If you are thinking of organizing a public event for your organization, we recommend that you activate the "Default Training" feature. Share the registration code during the event! so that participants can access it directly. Check out our article Login or Register.
Note: Required fields are marked with a "Blue Asterisk".
Questions
There are three different ways to add questions:
From the "Add from Excel" button to create new questions:
Click the "Add from Excel" button. In the pop-up window:
Click on the "Download" button if you need to download the Excel question template. Check out our article Create questions with Excel
Click on the "Select" button to import the new questions
Find the excel question template on your PC and click the "Open" button
Click the "Add" button
If you are confused about the file selection, click the "Cancel" button to reselect
If you need to add multimedia to the questions, go to the list of "Complete" questions to edit them. Check out our article Edit, translate or delete a question
Click on the "Save draft" button to continue with the configuration at another time or click on the "Continue" button
From the "Create Question" button to access all its sections:
Category
Question
Multimedia
Random order
Answers
Search and select category or category path
We recommend that you add a media file. This will make your questions more dynamic
Choose Random order Yes or No. By default, Yes will always be the chosen option if not changed
You can only create questions with several answer alternatives, with a maximum of 5 alternatives. Add the answers you need and click on the "Circle" to select the correct alternative
Click the "Save" button
Note: To add translations or create pills, edit the question from the list of Completed Questions. Check out our article What are training pills, how to create and translate them
Check out our article Create a question
- From the "Available Questions" button. Search and select already created questions:
Click on the "Available questions" button. In the pop-up window:
Use the filters to find the questions. The most commonly used are by category or by date of creation
You can view the questions in groups of 10, 25, 50 and 100
Click on the "Add Questions" button at the top
Click on the "Save draft" button to continue with the configuration at another time or click on the "Continue" button

Note: Training questions can be in a specific order or in random order:
Random: Questions will be displayed in a different order to each user in the App. Enable the "Random Order" feature in the list of added questions. It is disabled by default
Specific order: The questions will be shown in the same order to each user in the App. To sort the list, click on the question name to select it and move it to the position you need. Remember to disable "Random Order"
To eliminate questions:
Search and select questions already created and visible in the "Added questions" list
Click the "Delete Questions" button at the top and bottom of the "Added Questions" list
Click on the "Save draft" button to continue with the configuration at another time or click on the "Continue" button
Users
To add users:
Search and select users already created and visible in the "Available users" list
The most commonly used filter to select users is "Choose segments" to select the segment values
Click on the "Add users" button at the top and bottom of the "Available users" list
Click on the "Save draft" button to continue with the configuration at another time or click on the "Continue" button
To remove users added to a training:
Search and select users already created and visible in the "Added users" list
Click on the "Delete users" button at the top and bottom of the "Added users" list
Click on the "Save draft" button to continue with the configuration at another time or click on the "Continue" button

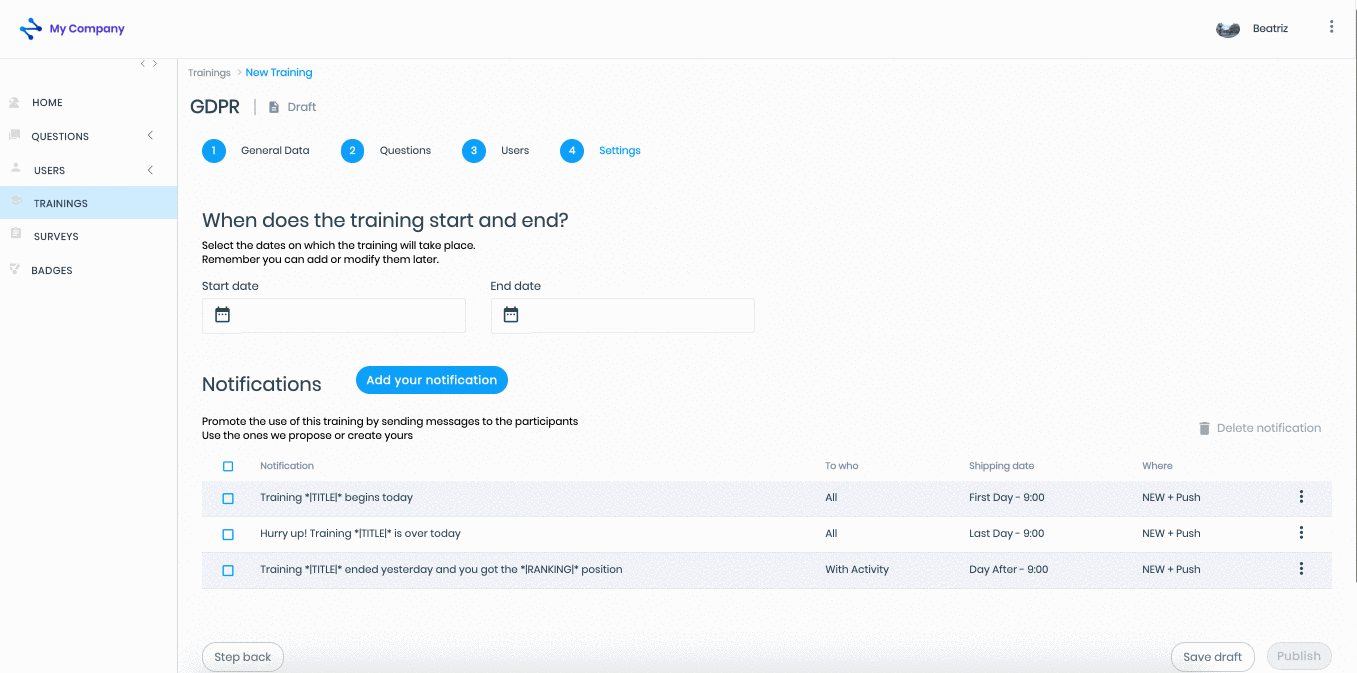
Settings
Dates: Select the start and end dates of the training if you need it
Click the "Save draft" button to save the workout in the "Draft" state or click the "Publish" button to save the workout in the "Published" state
Click on any section in the left side menu to exit the workout history
Did you find it helpful?
Yes
No
Send feedback Sorry we couldn't be helpful. Help us improve this article with your feedback.
 check ticket status